Master pages an important feature that was introduced in ASP.NET 2.0. Master pages are similar to web user controls in that they, too, are composed of HTML and other controls; they can be extended with the addition of events, methods, or properties; and they can’t be loaded directly by users—instead, they’re used as building blocks to design the structure of your web forms.
A master page is a page template that can be applied to give many web forms a consistent appearance. For example, a master page can set out a standard structure containing the header, footer, and other elements that you expect to display in multiple web forms within a web application.
Master page files have the .master extension, and, just like web forms and web user controls, they support code-behind files. All master pages inherit from the class System.Web.UI.MasterPage.
Designing a site structure using master pages and web user controls gives you the power to modify and extend the site easily. If your site uses these features in a well-planned way, it can be very easy to modify certain details of the layout or functionality of your site, because updating a master page or a web user control takes immediate effect on all the web forms that use the file.
As we’ve already mentioned, a master page is built using HTML and controls, including
the special ContentPlaceHolder control. As its name suggests, the ContentPlaceHolderis a placeholder that can be filled with content that’s relevant to the needs of each web form that uses the master page. In creating a master page, we include all of the basic structure of future pages in the master page itself, including
the <html>, <head>, and <body> tags, and let the web forms specify the content that appears in the placeholders.
Let’s see how this works with a simple example. Suppose we have a site with many pages, all of which contain a standard header, footer, and navigation menu, laid out as per the wireframe shown in below Figure .
Figure : A simple web site layout
If all the pages in the site have the same header, footer, and navigation menu, it makes sense to include these components in a master page, and to build several web forms that customize only the content areas on each page. We’ll begin to create such a site in Chapter 5, but let’s work through a quick example here.
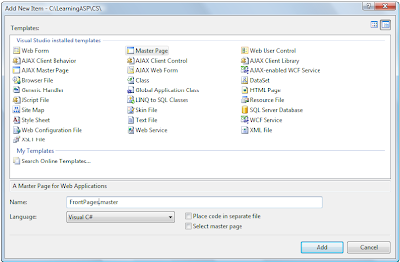
To keep this example simple, we won’t include a menu here: we’ll include just the header, the footer, and the content placeholder. Add a new file to your project using the Master Page template in Visual Web Developer. Name the file FrontPages.master, as shown in Figure 4.13, and select the appropriate language. You’ll notice that some <asp:ContentPlaceHolder> tags have been created for you already, one in the <head>, and one in the page body. You can remove them and modify the page like this:
Visual Basic LearningASP\VB\FrontPages.master
<%@ Master Language="VB" %>
<!DOCTYPE html PUBLIC "-//W3C//DTD XHTML 1.0 Transitional//EN"
"http://www.w3.org/TR/xhtml1/DTD/xhtml1-transitional.dtd">
<script runat="server">
</script>
<html xmlns="http://www.w3.org/1999/xhtml">
<head runat="server">
<title>Untitled Page</title>
</head>
<body>
<form id="form1" runat="server">
<div>
<h1>Welcome to SuperSite Inc!</h1>
<asp:ContentPlaceHolder ID="FrontPageContent"
runat="server" />
<p>Copyright 2006</p>
</div>
</form>
</body>
</html>
Again, the C# version is identical except for the Masterdeclaration at the top of the page:
C# LearningASP\CS\FrontPages.master(excerpt)
<%@ Master Language="C#" %>
⋮
Figure : Creating a Master Page
The master page looks almost like a web form, except for one important detail: it has an empty ContentPlaceHolder control. If you want to build a web form based on this master page, you just need to reference the master page using the Page directive in the web form, and add a Content control that includes the content you want to insert.
Let’s try it. Create a web form in Visual Web Developer called FrontPage.aspx, and check the Select master page option. This option will allow you to choose a master page for the form; Visual Web Developer will then use that master page to generate the code for you. Edit it to match this code snippet:
Visual Basic LearningASP\VB\FrontPage.aspx(excerpt)
<%@ Page Language="VB" MasterPageFile="~/FrontPages.master"
Title="
Front Page
" %>
<script runat="server">
</script>
<asp:Content ID="Content1" ContentPlaceHolderID="FrontPageContent"
Runat="Server">
<p>
Welcome to our web site! We hope you'll enjoy your visit.
</p>
</asp:Content>
The VB and C# versions of this code are the same except for the Language attribute on the Page declaration, but because Visual Web Developer generates all the code for you automatically, you don’t need to worry about it—instead, you can focus on the content.
You’re all set now! Executing FrontPage.aspx will generate the output shown in Figure.
Figure: Using a master page to set the header and footer
Although the example is simplistic, it’s easy to see the possibilities: you can create many web forms based on this template very easily. In our case, the master page contains a single ContentPlaceHolder, but it could have more. Also, we can define within the master page default content for display inside the ContentPlaceHolder on pages whose web forms don’t provide a Content element for that placeholder.
We’ll explore Visual Web Developer’s capabilities in more depth in the following chapters, but for now you can play around with it yourself, using Design mode to visually edit web forms that are based on master pages. Looking at Figure below, you can see that the content of the master page is read-only, and that you can edit only the content areas of the page.
Figure : Design mode shows the editable areas of a form that uses a master page


